
10 Frequently Asked Questions about Bleed and Crop Marks

estimated reading time: 8 minutes
Commercial Printing FAQ: Bleed and Crop Marks
Bleed and Crop Marks are graphic design concepts that can be
confusing to many people. But once you understand how the equipment used for
print production physically works (which this article will explain) the usage and importance
of bleed and crop marks becomes more clear.
By setting up artwork files with proper bleed and crop marks from
the start, you can ensure professional-looking results, prevent costly
reprints, and make the entire print process much smoother for yourself and your
chosen printing company.

1. What is Bleed in commercial printing?
The printing term "Bleed" might sound like it has something to do with ink soaking into the paper or the ink spreading where it shouldn't (like the way a fabric dye might bleed). However, Bleed has nothing to do with ink seepage.
In commercial printing, Bleed simply refers to the portion of artwork that extends beyond the final trim size of a printed piece (usually 1/8" past the edge). This extra image area is intentionally added so that when the paper is cut down to its finished size, the design reaches all the way to the edge with no unintended white borders.
Even though a digital artwork file displaying on a screen
has clearly defined edges, the edges of a printed document aren't defined until
the paper is physically trimmed to the desired size.
During
this trimming process, large stacks of printed sheets get cut all at once using
industrial guillotine cutters. Although these cutting machines are extremely
precise, they are still mechanical devices. And any equipment that relies on
moving parts requires a slight tolerance for movement - often as small as 1/32" to 1/16".
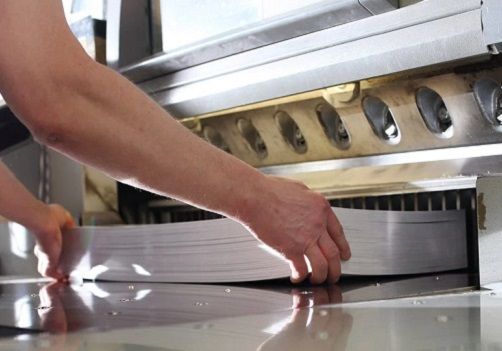
Adding bleed to the artwork file provides a buffer zone that
protects against minor shifts in the paper stack or the cutting blade during
trimming. Because these small movements
are unavoidable, bleed (and crop marks) are essential parts of file setup.
When trying to understand the concept of bleed, many people experience their "aha" moment when they realize bleed is nothing more than a practical solution to compensate for the mechanical variations that occur during trimming.
Without bleed, even a slight shift can result in a thin white
strip appearing along one or more edges of a printed piece. Bleed eliminates
this risk by giving the cutter some leeway in the form of "extra" artwork to trim away.
In other words, it is more logical to simply cut through a
section of extended artwork (the bleed area) than trying to hit every trim line
dead center with a paper shear and risk having a sliver of the paper's base
color appear along one or more edges of the finished pieces.
Understanding the need for a trimming tolerance helps explain why commercial printers recommend:
- 1/8" bleed on all sides
- Keeping important content at least 1/4" inside the trim lines
- Including properly placed crop marks to indicate the trim lines
These small precautions absorb any shifting that may occur
during normal production movement.
2. How much Bleed should I add to my document?
The standard bleed allowance in the United States is 1/8"
(0.125") on all sides of the document. This means if the finished size of
your printed document will be 8.5" x 11", the artwork should
actually be set up at 8.75" x 11.25" to include the proper 1/8" allowance
for bleed around the entire perimeter. Likewise, if the finished size will be
9" x 6", the artwork file should be set up at 9.25" x 6.25".

3. Why is Bleed especially important for full-color backgrounds?
Bleed is critical whenever your design includes full-color
backgrounds, photos, textures, or graphics that extend to the edge of the page.
Without bleed, these edge-to-edge design elements are where trimming variations
becomes visible. This is especially important for projects like comic books,
book covers, brochures, posters, and marketing materials, where full-color
designs are common and visual impact matters.
During finishing, large stacks of printed sheets are cut down to their final size. Even with highly accurate equipment, a normal trimming tolerance of 1/32" to 1/16" can occur. If your background color or image stops exactly at the trim line and no bleed is present, a slight shift during trimming can expose a thin white strip of unprinted paper along the edge of the page. The white strip appears because the cutting blade didn't hit exactly on the intended edge of the document.
These thin strips of white make printed pieces look substandard and are particularly unsightly on solid color backgrounds. For example, a bright red, dark blue, or deep black background will clearly highlight an unintended white edge. The same is true for any photographs or illustrations that run to the edge of the page. What looked perfect on your tablet or computer screen can suddenly appear uneven or unprofessional in print.
This is why bleed is so important. Adding the standard
1/8" bleed allows your artwork to extend beyond the trim line. This artwork
extension will be cut away during finishing, ensuring the background color or
artwork reaches cleanly to the edge of the finished piece without a thin line
of unprinted paper being visible.
By building bleed into your file from the start, you protect
edge-to-edge backgrounds from trimming variation and ensure crisp, professional
results in the final printed product.
4. Can I add Bleed after my design is finished?
Bleed can sometimes be added after a design is finished, but
it can be difficult, time-consuming, or even impossible to do correctly without
altering the artwork.
Bleed requires that your background colors, images, or
design elements extend past the final trim size of the document. So if your
file was originally created at the exact finished size with no extra image
area, there is simply nothing to extend into the bleed space.
For simple designs with solid color backgrounds, adding
bleed after the layout is complete may be fairly simple. But for complex layouts with
detailed imagery, adding bleed after the fact will often require a significant
redesign.
This means you, your graphic designer, or your printer's prepress
department must try to "manufacture" bleed by stretching the existing background,
cloning the edges, or rebuilding parts of the layout. These workarounds can
compromise image resolution, distort artwork, or pull design elements like text
or page numbers too close to a trim line.
This is why commercial printers strongly recommend setting
up bleed at the very beginning of the design process. Most design programs
allow you to define bleed in the document setup so your artwork is built
correctly from the start.

5. What happens if I forget to add Bleed to my artwork?
Forgetting to add Bleed can cause your print project to look
uneven or poorly aligned after being trimmed, even though the design was
correct on your screen.
To make sure this doesn't happen, your printer's prepress
department may request that you send a corrected file that includes proper
bleed. Or, if your artwork isn't too complex, they may ask your permission to
allow them to artificially add the bleed. Depending on the remedy, there will
likely be delays and possibly extra charges.
6. What are Crop Marks in a print file?
Crop Marks are thin lines placed at the corners of a print
layout that show exactly where the paper should be trimmed to reach the final
finished size. Crop marks act as visual guides for the cutting equipment operators
during the finishing stage of print production. Including crop marks in your
print layout helps ensure precise trimming and professional results.
As explained above, when a document includes bleed, the
artwork will extend a little bit past the final size of the piece. Crop marks
indicate where this extended bleed area will be trimmed off. Without crop
marks, the cutting operator has no precise reference point for where the
printed sheets should be cut, which can lead to inconsistent sizing or
important design elements being trimmed away.
Crop marks are typically used in conjunction with bleed
settings to create a properly prepared file for commercial printing. Many
graphic design programs can automatically add crop marks when exporting a
print-ready PDF.
Crop marks provide a clear, universal trimming reference
that ensures:
- Consistent final page sizes
- Accurate trimming across large stacks of paper
- Proper removal of the bleed area
- Professional, even edges on the finished piece
Despite their importance, crop marks are sometimes missing
or incorrectly placed on artwork submitted for printing. Since crop marks help
prevent trimming mistakes, they are highly recommended for all print layouts
but are especially important for layouts that bleed.
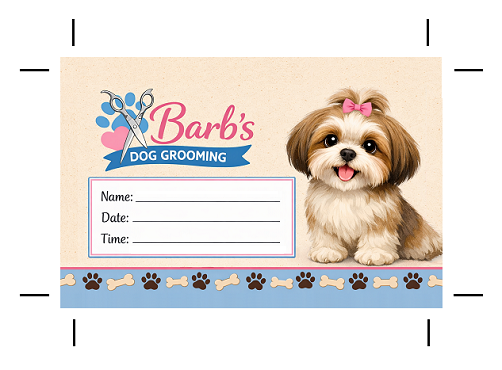
7. Where should Crop Marks be placed?
Crop marks should be placed outside the final trim size, at
each corner of the layout. They can extend slightly into the bleed area or they
can be placed just outside of the bleed area. Either way, they should clearly
indicate where the paper is to be cut but not interfere with the actual design.
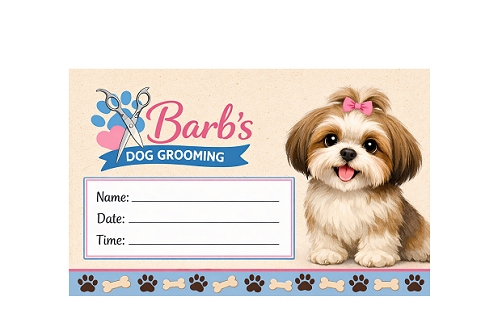
A properly prepared print file includes these three elements:
- Trim Area - the final finished size of your project
- Bleed Area - typically 1/8" beyond the trim on all sides
- Crop Marks - placed to indicate the trim lines
8. Are Crop Marks printed on the final piece?
No. Crop marks are completely removed during trimming and
never appear on the final printed piece.
It is important to understand that the crop marks and bleed areas
are temporary additions to the artwork. They exist only for production purposes
and will be cut off during the final trim.
9. Why do printers need Crop Marks if the page size is correct?
It helps to remember that the page size in an artwork file
only exists digitally on a screen. Even though the correct page size is
submitted, crop marks are still required to show where the printed sheets need
to be trimmed to achieve that same page size in the physical world.
Also, pages are rarely printed or trimmed one at a time in a
commercial printing facility. Multiple pages are often printed together on
large parent sheets, then cut down in stacks using commercial guillotine
cutters. The guillotine operator is not looking at your digital page size, they
are looking at the visual trim guides on the printed sheet. Crop marks tell
them precisely where each page begins and ends.
Without crop marks, the operator must estimate the trim position based on the layout, which can lead to slight inconsistencies in sizing or margins. This becomes especially risky when your design includes a bleed for full-color backgrounds or images that extend to the edge of a page.
10. What happens if Crop Marks are missing from my file?
While it may seem like a small detail, it is important to add
crop marks to your artwork file. Crop marks work together with bleed to tell
the cutting operator exactly where the trim line is located.
If crop marks are missing from your print file there will be
no clear visual guide to show where the piece should be trimmed to reach its
final size. Without crop marks, the production team would have to stop and
manually determine the intended trim size from the layout, which can slow down the
process.
So if your artwork file is missing crop marks, your printer
may ask you to send a corrected, print-ready file. Or, the printer's prepress
department may add the crop marks for you, which takes extra time and could
lead to artwork charges.
The good news is that crop marks are easy to include before
you submit the file. As mentioned previously, most graphic design software programs
can automatically add them when exporting a PDF with bleed enabled.
Need Help with your Printing Project?
If you have any additional questions about Bleeds or Crop Marks,
or want to discuss an upcoming print project, be sure to get in touch
with Color Vision Printing. As a full-service commercial printer, we can
help with just about any printing need you might have.
Over the past 40+ years, Color Vision has developed a strong
reputation in the printing industry by offering quality printing at affordable
prices. In addition to our offset and digital printing services, we offer a
wide range of finishing and binding options.
If you would like a quote, just use our easy Quote
Request form to send us your specifications. Or, if you prefer to discuss your
project by phone, we can be reached at 800-543-6299.
As always, we look forward to assisting with your custom printing needs!
Related Articles

Direct Mail Marketing Campaigns: 3 Different Approaches
Read This Article

How Print Materials Help a Business Accomplish its Goals
Read This Article

Print Marketing: 5 Low Cost Ways to Promote your Business
Read This Article

Printing Proofs: Pay Extra Attention to Contact Information
Read This Article